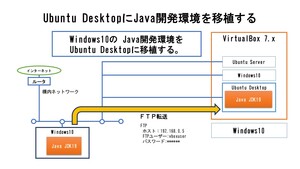
Linux Ubuntu 環境で C# と Mono Framework を使用してウィンドウを表示する方法について説明します。
目次
Linux Ubuntu C# Mono Frameworkでウィンドウを表示する
必要なパッケージのインストール
まず、Mono Framework と GUI ライブラリである System.Windows.Forms を使用するために必要なパッケージをインストールします。以下のコマンドをターミナルで実行します。
Bash
sudo apt update
sudo apt install mono-complete libgtk2.0-dev
mono-complete: Mono Framework のコンパイラやランタイムなど、開発に必要なパッケージをまとめてインストールします。libgtk2.0-dev:System.Windows.Formsが内部で使用する GTK+ 2.0 の開発用ライブラリです。
C# コードの作成
次に、ウィンドウを表示する C# コードを作成します。テキストエディタで以下のコードを Window.cs という名前で保存します。
C#
using System;
using System.Windows.Forms;

public class Window : Form
{
    public Window()
    {
        Text = "Hello, Mono!";
        Width = 300;
        Height = 200;
    }

    public static void Main()
    {
        Application.Run(new Window());
    }
}
System.Windows.Forms名前空間をusingディレクティブでインポートします。WindowクラスはFormクラスを継承し、ウィンドウのタイトル、幅、高さを設定します。MainメソッドでApplication.Runを呼び出し、ウィンドウを表示します。
C# コードのコンパイル
作成した C# コードをコンパイルします。以下のコマンドをターミナルで実行します。
Bash
mcs -pkg:gtk-sharp-3.0 -out:Window.exe Window.cs
mcs: Mono C# コンパイラです。-pkg:dotnet:System.Windows.Formsを含む .NET アセンブリを参照するためのオプションです。
コンパイルが成功すると、Window.exe という実行ファイルが生成されます。
ウィンドウの実行
以下のコマンドをターミナルで実行し、ウィンドウを表示します。
Bash
mono Window.exe
実行サンプル
サンプルプログラム frame.cs
// コンパイル mcs -pkg:gtk-sharp-3.0 -out:frame.exe frame.cs
// AOT コンパイル mono --aot Program.exe
// 実行 ./frame.exe

using System;
using Gtk;

class GtkLoginApp : Gtk.Window
{
    Entry t1, t2;
    Button b1;
    Label l1;

    public GtkLoginApp() : base("LOGIN FRAME")
    {
        SetDefaultSize(650, 400);
        SetPosition(WindowPosition.Center);
        DeleteEvent += delegate { Application.Quit(); };

        Box vbox = new Box(Orientation.Vertical, 10);
        Add(vbox);

        // CSS適用
        CssProvider cssProvider = new CssProvider();
        cssProvider.LoadFromData(@"
            label.title {
                font-size: 38px;
                font-weight: bold;
                color: white;
            }
            label.result {
                font-size: 24px;
                font-weight: bold;
            }
            .title-box {
                background-color: blue;
                padding: 10px;
            }
        ");
        StyleContext.AddProviderForScreen(Gdk.Screen.Default, cssProvider, uint.MaxValue);

        // Title Panel
        Label titleLabel = new Label("GTK# Sample");
        titleLabel.StyleContext.AddClass("title");

        EventBox titleBox = new EventBox();
        titleBox.StyleContext.AddClass("title-box");
        titleBox.Add(titleLabel);
        vbox.PackStart(titleBox, false, false, 10);

        // Main Panel
        Fixed mainPanel = new Fixed();
        vbox.PackStart(mainPanel, true, true, 10);

        t1 = new Entry { WidthRequest = 300 };
        t1.Changed += OnT1Changed;
        mainPanel.Put(t1, 50, 30);

        t2 = new Entry { WidthRequest = 300 };
        t2.Changed += OnT2Changed;
        mainPanel.Put(t2, 50, 70);

        b1 = new Button("Button") { WidthRequest = 80, HeightRequest = 40 };
        b1.Clicked += OnButtonClicked;
        mainPanel.Put(b1, 400, 70);

        l1 = new Label("Label1");
        l1.StyleContext.AddClass("result");
        mainPanel.Put(l1, 50, 110);
    }

    // `object? sender` → `object sender` に修正
    void OnButtonClicked(object sender, EventArgs e)
    {
        l1.Text = "ボタンが押された";
        Console.WriteLine("Button clicked!");
    }

    void OnT1Changed(object sender, EventArgs e)
    {
        l1.Text = t1.Text;
        Console.WriteLine("Text changed: " + t1.Text);
    }

    void OnT2Changed(object sender, EventArgs e)
    {
        l1.Text = t2.Text;
        Console.WriteLine("Text changed: " + t2.Text);
    }

    public static void Main()
    {
        Application.Init();
        new GtkLoginApp().ShowAll();
        Application.Run();
    }
}
コンパイル
mcs -pkg:gtk-sharp-3.0 -out:frame.exe frame.cs
実行
./frame.exe
補足
System.Windows.Formsはクロスプラットフォーム対応ではないため、Windows 以外の環境では外観や動作が異なる場合があります。- よりモダンな GUI ツールキットとして、クロスプラットフォーム対応の Avalonia や GTK# なども利用できます。